Thursday, May 21, 2009

Nevsky preview

To my surprise, Battlefront is coming out with a Nevsky M4A2 Sherman. At the risk of exaggerating and stealing the 1980's NBA slogan - It's Fantastic!

Photobucket

Photobucket

The complete write-up on Nevsky and more photos can be found on the FoW website:

http://www.flamesofwar.com/Default.aspx?tabid=53&art_id=1187

I've commissioned GeekEGuy (see link to the right) to do Nevsky. All those cool stowage is beyond my painting capabilities and I really want Nevsky to be a step above the other M4 "Emchas".

I realize I haven't posted the composition of my Lend Lease unit. Ditto for 11th Panzer. I'll have to post those soon.

Friday, May 15, 2009

Finished the 1st M4A2 "Emcha"

Photobucket

There it is! It's the first ever FoW anything I have ever tried and attempted to paint.

I was so into painting I didn't take any other pics between the stages of primering, weathering, decaling and then applying the Magic Wash.

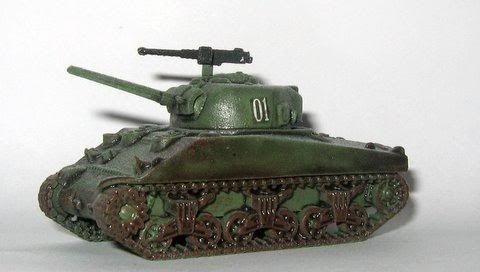
ArmyPainter Matt Varnish is sprayed atop everything. There's a few small areas I missed, like the bottom front of the tank, but it did a great job. The picture makes the finish look glossy because flash was enabled due to a lack of a good light source.

Lessons Learned:

1) You can see the outline of the decal. I applied the Magic Wash after the decals because I wanted the numbers to look weathered. Instead, the Magic Wash highlighted the edges of the decal. I'll apply the decals after the Magic Wash and then lightly dry brush smoke and black for weathering.

2) I need a straight brush the size to handle the decals.

3) I will leave the tracks off the hull. They will be primed and weathered and then glued to the hull.

4) Learn Magic Wash. I might just dip the next tank into the jar and let it drain. I had a few small bubbles develop on the right side of the hull from unnoticed air pockets.

5) I like how the Flat Brown "rust" look works with Magic Wash.

I can't argue with the results. I am VERY happy with Army Painter.

Tuesday, May 12, 2009

Detouring away from treads

I found time today to start working on the treads. I was using a Vallejo gunmetal grey, but after a few swipes of the brush, I didn't like the look of the color.

As if to add commentary to the color, the right set of treads broke off the hull and I had to reglue them. It seems I also missed primering the bottom of the treads.

All in all, I applied the primer once again to the tracks and the gunmetal grey.

I forgo the gunmetal grey and use Red Brown and drybrush the tracks. Then I'll apply the decals.

It's frustrating, but this is the test model to figure out what I like and don't like. I'm just getting impatient to get the M4A2 done so I can order the next batch.

Sunday, May 10, 2009

I primed the M4A2 Emcha. I'm very happy with the results, so much so that I wanted to post the picture.

Photobucket

The Army Painter Primer Green turned out very nice! I don't own an airbrush. Using a spray can is the next best alternative.

I stopped by the LGS and picked up Vallejo Matt Black and Red Brown. The next step is to paint the treads grey, .50 AAMG black and then weather the treads and vehicle with Red Brown to simulate rust. Afterwards, it's decals and the Magic Wash.

I am running into the bane of all modelers - time!

What a difference in pictures! What led to the higher quality photos?

Check this link out: http://www.weetoysoldiers.c htom/wp/?p=439

It's one of the best if not the best article to help in taking pictures of miniatures. What's the point of spending all the time and effort on painting and detailing if you can't take a photo and share it with everyone else?

Friday, May 8, 2009

1st M4A2 Emcha assembled

Apologies for the blurry photograph. My digital camera isn't very good with close ups and I didn't use a tripod to stop any of the normal "shake" when the shutter it depressed with the finger. The next pictures will have to be taken a further away. Hopefully I'll be able to then zoom in the photo and get a closer look at the miniature.

Photobucket

Curiously, the turret is "stuck" to the hull. I tried an exacto blade, a small screw driver and other small tools to "pry" the darn turret off the hull. It's like the turret was welded onto the hull! I e-mailed BattleFront's customer service department, so I'll see what they say. Their customer service has a good reputation.

I had no other major issues with the M4A2 Emcha model. I had to trim one side of the tract connectors - the connectors that are glued into the pre-cut slots on the side of the Hull. Those of you who build Shermans will know what I'm talking about. A few turns of the exacto blade enlarged the pre-drilled hole for the .5o AAMG. The frozen turret was by far the biggest issue and I'm sure it's an isolated case.

In any event, I then used the Army Painter Army Green primer, stuck turret or no. This Sherman model is the "trial-and-error" piece where I can practice using Army Painter and learning how to apply those small 15mm decals. I'll still use the tank as part of the Lend Lease Mechanized Corps, don't get me wrong. It's just that I hope my skill with building and painting the tanks improves with each one.

The Sherman is in the garage, drying. I'll try to take better photos and post them tomorrow before I apply decals and then the Magic Wash.

Tuesday, May 5, 2009

Army Painter Arrives

I have to say the WarStore is a great outfit. You place an order and receive 4 or 5 confirmation e-mails detailing your order, the amount of the order, UPS tracking information, estimated day of delivery and then a thank you.

Photobucket

I never thought decals could be so small!!! Arggh, it's going to be fun -- not!

The other day I realized I no longer have my favorite card table to model. I could use the antiques of She Will Be Obeyed, but it will be hazardous to my health. I need to make a trip to Target and see what they offer. I need wire strippers anyway for a different project.