Friday, April 23, 2010

Panzer IV E Platoon - Detailing

Photobucket

I've been doing things in stages. It's almost like this platoon of tanks is becoming a tutorial for me to reference when I start the next series of vehicles.

Rookie Mistake - Paint both sides of the tracks!!! You may have noticed that I primed and base coated the road wheels side of the tracks. When testing the fit of the tracks, the unpainted side of the tracks near the fenders was visible. Arggh! In a quick fix, I drybrushed black and panzer grey behind the vendors, along with two or three road wheels on each side of the tracks, to hide the bare metal. It worked. So that's a Memo to Self moment.

I did a horrible job with the lighting for the picture below. I may have to invest in a photography box ($99+) to bring out the details or move the workbench outside to take the pictures.

I wanted to show that I painted the tracks Red Leather and then drybrushed Gun Metal Grey over it. The effect really doesn't show up in the photo, unfortunately. Neither did the tools, which I used Mahogany Brown for the wood and Gunmetal Grey for the metal.

Photobucket

Here's the stowage that I painted. I couldn't find any reliable photos or pictures of gas cans to pick a color. I went with green just to break up the monotony of the panzer grey. The engine exhaust is also Red Leather. I need to tone it down. I may go with a dry brush of smoke.

Photobucket

I have Magic Washed the platoon and have plenty of decals applied. I'll post those pictures next time.

In other Early War News - -

Photobucket

Phil of Battlefront has announced that Early War has not been delayed and will be released in August. Huzzah! The unofficial release schedule Phil mentioned several months ago is official in that Poland / France will out in August. The following year will be next year and finally the Russia campaign (Barbarossa) will be arriving in 2012.

In other news, the Budapest book will also be out later this year! My modeling times may be split between the news Dogs and Devils book coming out in May (can you say Herman Goering Panzergrenadiers) and the Budapest book (non-zimmerit Panthers!).

Have a great weekend.

Thanks for visiting and any feedback.

Thursday, April 15, 2010

Lions Den I - Recap

I want to thank Tim K for putting Lions Den I on and making it a great success. Instead of 18 players, we had 14 because players couldn't make it for one reason or another. Still, with 7 tables and a fun atmosphere, it was a great tournament.

Tim is a great TO. He provided regular updates on the time remaining for each series of games. He was there to answer rules questions or questions regarding the terrain features of each board. Tim put a lot of hours of his personal time to ensure that Lions Den ran smoothly.

Tables inside the Realm
Photobucket

More tables
Photobucket

Tim giving instructions before the start of the first game
Photobucket

An SU-152 belong to Peter H
Photobucket

Another piece from Pete's Russkis
Photobucket

Bill W's Sperrveband
Photobucket

Bill W's Flamers - Flame On!
Photobucket

More Flamers of Bill's
Photobucket

One of Bill's Hetzers
Photobucket

Nice basing by Bill
Photobucket

Hetzer and Hetzer
Photobucket

An 88
Photobucket

Bill W won Best Painted Army. Bill also won the tournament with three 6-1 victories. Bill is widely regarded as one of the best FOW players in the world. He went to New Zealand and won the LW Grand Tournament with a Guards force from Hells Highway book. His army was featured in an issue of Wargames Illustrated three months ago.

Bill's also a great and creative painter. I wish I had a chance to pick his brain, but I didn’t want to disturb his games. I think he carries his forces in two boxes (about size of shoe boxes) but the bottom of boxes is magnetized to prevent his vehicles and infantry stands from shifting. They are carry-ons when he flies to tournaments.

To sum up Lions Den, I was nervous about my first tournament and now can't wait until the next one I can attend.

Friday, April 9, 2010

Lions Den I - Part III: Game 3

Mission 3: Encounter versus Hugo M’s 21st Panzer Division

For the third game, Tim pairs players based on their total scores from the first two games. Bill W and Matthew J square off at the Main Event table to determine the tournament champion. They are playing on the table behind me. Hugo and I both frown when we see it’s a Blue on Blue game. Hugo really frowns when he sees the Jagdpanthers and Noak’s Panther.

Hugo wins the die roll and chooses a side. The terrain on the table was neutral, offering orchards and hills to both players for concealment and overwatch positions. A special Italy terrain rule called for the orchards offering concealment bonuses, however, any unit in an orchard can see and shoot and can be seen and shot at.

The Battlefield
Photobucket

Hugo deploys a platoon of 5 Pz IVs, another platoon of 3 Pz IVs, a Tiger and then his CiC Pz IV is kampfgruppe with something at the back end of the table.

In Encounter, each side initially deploy half their force. Hugo recommends forming a kampfgruppe so I can get 3 platoons on the table to match his 3 platoons. I was hesitant. My HQ consists of 2 Jagdpanthers, plus Noak. For my two platoons I can place the other two Jagdpanthers and the StuG platoon. I can get all my armor on the table with just two platoons and the HQ. Bill W came over to help me. I didn’t do a good job of explaining my force structure because he recommended the kampfgruppe as well. So I pair the 2iC Jagdpanther with 1 StuG to make a third platoon and then place the 2iC and StuG near the other two StuGs in deployment.

I have the Jagdpanther platoon, CiC and Noak on the left side of the table near a hill. The 2iC and StuGs are on the right, sitting in an orchard.

Deployment Phase and Hugo thinking: "That's a lot of Jagdpanthers"
Photobucket

Hugo wins first turn. His big platoon of Pz IV’s come up over the rise I the Hill. His Tiger goes into the center of the town. Meanwhile, his other Pz IV platoon skirts next to buildings underneath the hills where I have the three Jagdpanthers and Noak waiting. The Tiger shoots at one of the Jagdpanthers, but misses. It stormtroopers behind a building. His big Pz IV platoon sends a volley at the orchard, gets a hit on a StuG, but it bounces thanks to the distance being 16”+ and the StuG having FA 7. The 2iC Jagdpanther moves, bogs and blows up a PzIV, while another PzIV succumbs to the StuG platoon fire.

Burning PzIV's
Photobucket

The Jagdpanthers and Noak maneuver to get shots at the Pz IVs underneath the hill. All shots miss. The Jagdpanther platoon fails to stormtrooper and remains on the Hill. Noak stormtroopers down the hill. I fear the Pz IVs coming up over the hill (skill check only) and keep front armor oriented that way. The Jagdpanther CiC stormtroopers off the hill and points it big gun at the gap between the hill and the edge of the table.

Noak and Jagdpanthers trying to shoot at PzIVs in village.
Photobucket

This is where Hugo could have done damage. On the second turn, two of Pz IVs come around the hill and see Noak’s side armor. He gets two shots and misses both! His other Pz IV platoon again comes up the hill and shoots. Hugo has bad dice, missing and getting a hit on a StuG that I save.

Hugo's PzIVs catch Noak with his pants down
Photobucket

More bad dice with Hugo failing the stormtrooper roll for the Pz IV platoon. The StuG platoon returns fire and kills a Pz IV. The 2iC, still bogged, blows up another Pz IV. Hugo’s surviving Pz IV fails morale and flees the board.

On the left flank, the Jagdpanther platoon rumbles down the hill to shoot at the Pz IVs that tried to snare Noak. Noak maneuvers for a shot and the CiC Jagdpanther stays put. It was crowded firing lanes and I took time to ensure that I had shots at all 3 Pz IV’s. My fire was good and the 3 Pz IV’s go up in smoke.

Reserves don’t start appearing until Turn 3. Hugo has lost two platoons and needs to make a company morale check. Hugo’s bad dice continue one more time and the 21st Panzer flees the table. Game over.

I didn't take pictures of the Turn 2 carnage with the game ended and Hugo picking up his force.

I felt bad for Hugo. It was a poor match up for his army. Daniel at a table behind Hugo asks if I feel bad for Hugo. I say yes and he says don’t. There will be times when I’ll be in an unfavorable match because of terrain or army types or both and I’ll get spanked. It’s the game. Bad match ups happen to everyone and your opponent isn’t going to feel bad when he stomps you to a 6-1 win. Message received.

Result: Win, 6-1

Lessons: The kampfgruppe of the 2iC Jagdpanther with the StuGs wasn’t about getting all the tanks and firepower onto the board. It was about putting 3 platoons on the board for company morale checks. If I lose one platoon, I’m at an instant morale check. It just dawned on me while writing this recap.

Dice: No extraordinary dice rolls to mention.

Sportsmanship: Even though the game was short, I still found Hugo a good opponent who was given a tough nut to crack. He was kind enough to offer the kampfgruppe suggestion so I could have equivalent of three platoons on the board. Hugo received the remaining 2 points I had to distribute for sportsmanship.

Platoon of the Match: 2iC Jagdpanther for killing two Panzer IV’s while bogged.

Next up, Tournament Recap and pics of other armies, The Realm and tables.

Thursday, April 8, 2010

Lions Den I - Part II: Game 2

Mission 2: Fighting Withdrawal versus Eric C’s 82nd Airborne with Guards Support

It was a relief to be fighting on the long edge of the table. No cramped quarters this time!

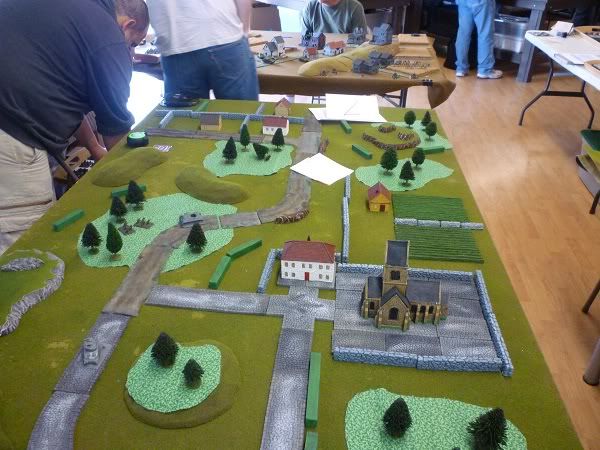
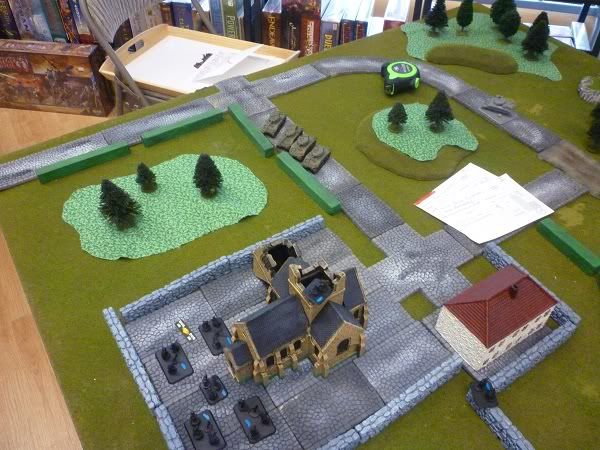
Eric and I rolled to see who’d get to choose what side of the table and Eric won. In fact, I don’t believe I won any of the die rolls to pick what side of the table I wanted. It didn’t matter in this case because I had plenty of room to deploy and maneuver. Bill W provided the terrain for this table. I particularly liked the big church on my side of the table. It was the perfect spot to place an observer, which I did.

The Big Church and my side of the table
Photobucket

Eric’s force is a blur to me. I took a quick glance at it to see many platoons of paras, a battery of 105mm artillery, an AOP spotter plane and Brit Guards support of 2 Shermans and 2 Fireflys. Eric gave me a sheepish smile when he placed the AOP on the board and said I was going to hate him. I laughed and then wondered if this game was going to be a repeat of artillery hell from Game 1.

Eric places an objective on the right flank (his left). I place an objective in the middle of the table and an objective on the left flank. My objective placement plan is to try to get Eric to spread his forces out across the table to contest each objective. The plan works. Plus, Eric has placed his objective on the right flank. In Fighting Withdrawal, the Defender’s objective cannot be removed from the table, whereas the other two objectives can be during certain game turns. Bill W later comes over during the game and tells Eric that the Defender’s objective should ALWAYS go in the center of the table. Since the Defender’s objective can’t be withdrawn, his entire force will be able to contest and support a center objective instead of being on the far side of the table.

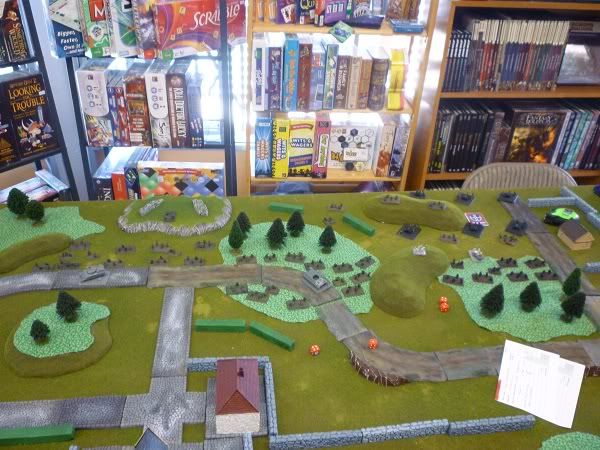
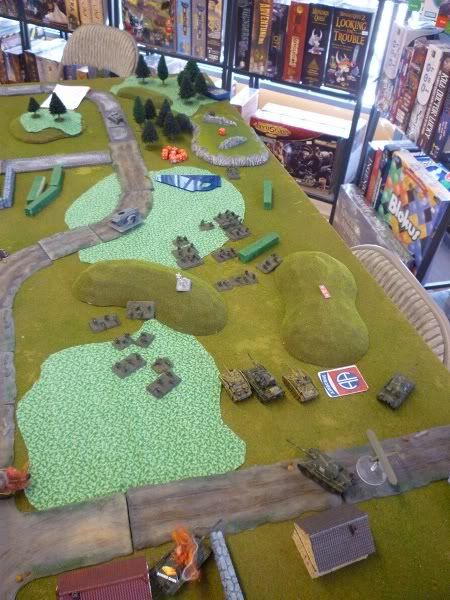
Eric's deployed army and objectives
Photobucket

Eric placement of his objective makes my decision for deployment. I loaded my right flank. All the Jagdpanthers, the 3 StuGs with Noak and the Yellow Grenadiers are placed on my right. Mortars went behind the church on the left flank and Red Grenadiers held down the center of the table.

The 654th Overloads the Right Flank
Photobucket

Everybody rushes forward, including the Yellow Grenadiers who try to make it to the woods. I didn’t drop smoke or anything and they get caught in the middle by artillery and infantry fire from Eric’s troops on the hill. They get cut down, suffer casualties and stay pinned. The CiC and 2iC go wide right towards the stone walls and hamlet. The 3 StuGs, Jagdpanther platoon and Noak aim for the crossroads and the artillery behind it.

One of the keys to game happens at this point.

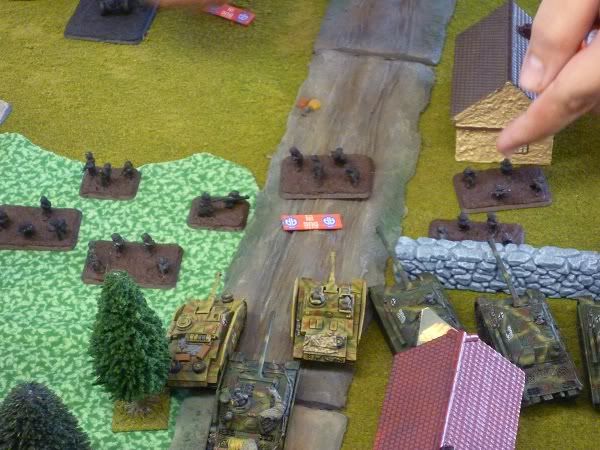
Eric shifts a platoon of paras out of the woods to block crossroads. I open up with main gun and machine gun fire from any vehicle that had an open LOS on the infantry stands in the open. Maybe Eric was worried about the 2iC and CiC doing a Hail Mary around his left flank. I don’t know, he never said and I never asked. Or maybe he just wanted to block the crossroads from a quick dash to his artillery.

Eric's platoon shifts to block the crossroads
Photobucket

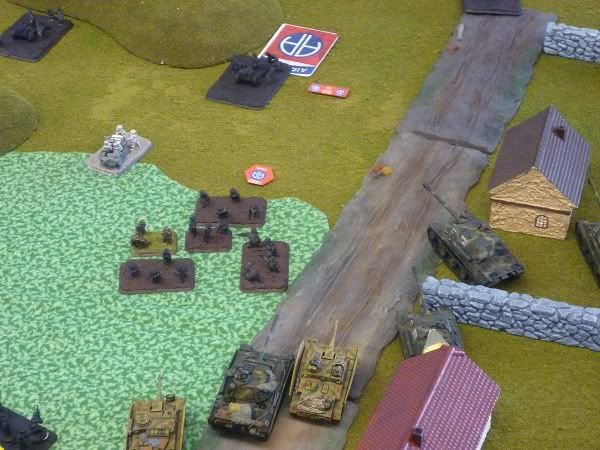
Also, Eric took a long time to decide where to deploy his ambush of Guards support of 2 Shermans and 2 Fireflys. I think where I had positioned the CiC and 2iC Jagdpanthers, taking up most if not all the space on my right flank in the hamlet prevented him from springing the ambush. The crossroads was covered by the 3 StuGs and Noak, while the other two Jagdpanthers had the artillery covered along with the hill top. No matter where he put the ambush on that side of the table, he’d be taking fire from two different directions. Instead, he chose to deploy the ambush on my far left flank, across from the mortars. The 4 tanks, after several turns, roll up the Red Grenadiers. The Red Grenadiers were amazing in the amount of punishment they took before dying to the last man. In two separate turns, they made 8 saves. In another turn, they rolled off another 4 saves. Eric was rolling his eyes, shaking his head and muttering in amazement about the Red Grenadiers making 20+ saves. The staff team of Red Grenadiers is eventually alone and defiant, firing its Luger pistol at the British armor before it’s gunned down.

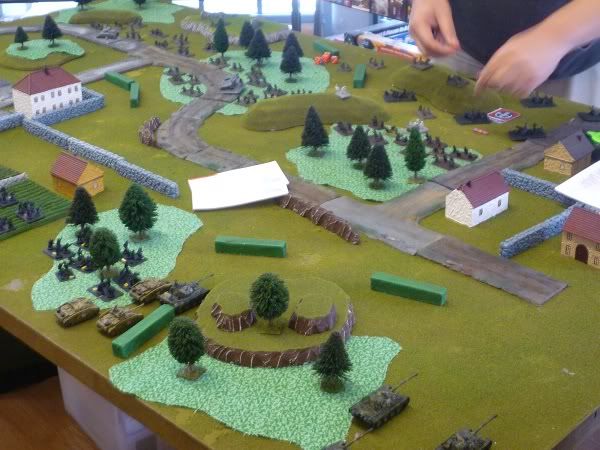
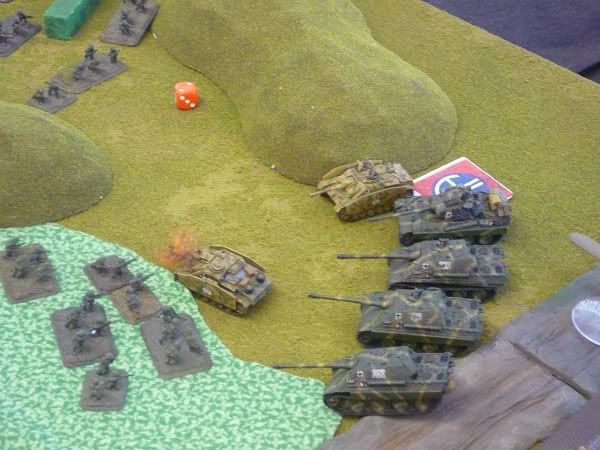
Eric's Guards ambush revealed and mortars are wondering what they got themselves into
Photobucket

Red Grenadiers showing their staying power
Photobucket

In any event, after three turns of maneuvering and bog checks, the armored vehicles crash into the crossroads platoon and destroy it. Units not involved in the assault, take pot shots at the artillery and knock out a gun. After the infantry is wiped out, the armored vehicles take revenge on the artillery by assaulting and running them into the ground. I joke with Eric about the vehicles are getting pay back for what the artillery did to them in Game 1 by driving back and forth over the broken guns and crew.

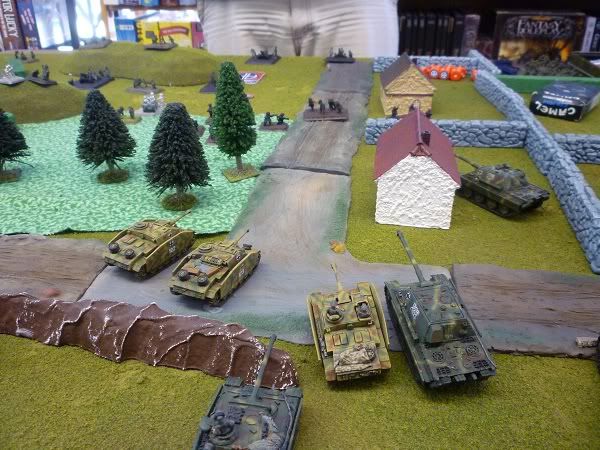
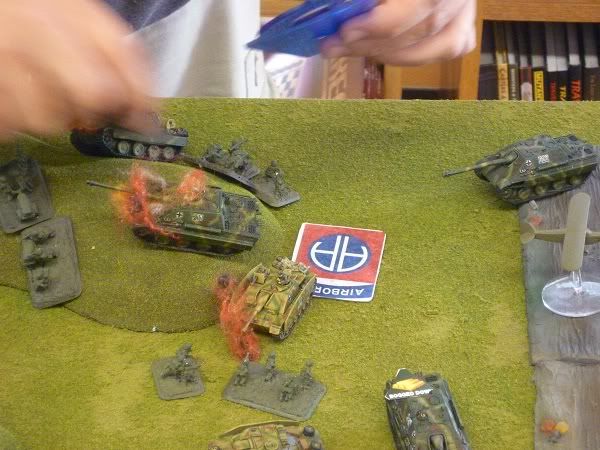
Assault ready to go in
Photobucket

Clearing the crossroads
Photobucket

Die Arty Die!!
Photobucket

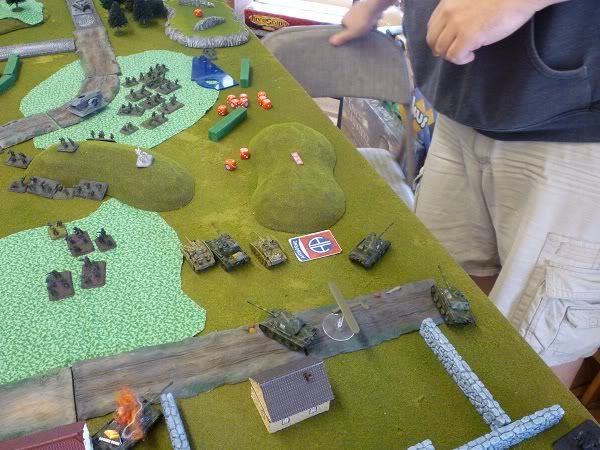
This is where I am thinking I have the game won at 6-1. The crossroads platoon and artillery battery is dead and nothing near the objective. However, Eric in a smart tactical move has been shifting his infantry across the board, double timing on the road because that’s one of the paras special abilities, to get over to contest the objective. Just as I clear the artillery away from the objective, paras come out of the woods, which I assault, lose a few vehicles and then the next wave comes up over the hills. I only have 2 Jagdpanthers and Noak left, not nearly enough to win an assault against veteran paras with sticky bombs and bazookas. They all die and it’s game over.

The game is ours!
Photobucket

Or maybe not...
Photobucket

Eric and I nearly took 2 hours to finish the game, nearly exhausting the 2 ½ hour time limit. Tim continually reminded us of our time. It wasn’t to pressure into playing quicker, just to make us aware of how much time was remaining. We were the last game to finish before Game 3.

The bitter end
Photobucket

It’s the most exhausting game of FOW I’ve ever played. I sat down for 10 minutes and walked around for another 10 because my knees ached and to get the circulation going again. I guzzled a bottle of water in 30 seconds. The game was back and forth. Every assault went three or four rounds and usually concluded when a unit was wiped out instead of it breaking off. Every unit that could shoot was brought into the fight near the contested objective. My head was pounding afterwards. An awesome game!

Result: Loss, 3-4

Lessons: I am thinking I should have had a more menacing force on the left flank to pin down a portion of Eric’s forces. It would have kept Eric honest and likely stopped him from sending all his forces on a pell mell rush to the threatened objective. Perhaps the 2iC and Red Grenadiers pushing up the left might have provided a good distraction. Eric maneuvered his infantry very well in assaults. Jagdpanthers lacking a turret really reduces the defensive fire available to pin an assaulting force. I need to learn how to position the Jagdpanthers for mutual fire support instead of stacking them road wheel to road wheel in a line. Looking at the picture I should have backed up past the objective, still within range to contest and force Eric's infantry to charge across open terrain. I also forgot to use my mortars in support of the advancing Yellow Grenadiers by laying down a smoke screen and they suffered for it. Finally, I didn’t reposition the Red Grenadiers to counter Eric’s revealed ambush. I should have dug them in and prepared to assault the tanks. Instead, they just stood there and took hit after hit after hit.

Dice: No complaints. Red Grenadiers were very lucky with their saves. My luck evened out in other areas of the game and Eric’s dice betrayed him with a bad saves early on but he made up for it with good assault rolls in the latter stages of the battle.

Sportsmanship: Eric is another great opponent. He patiently took the lead in explaining the assaulting rules, which is admittedly one of the weak points in my understanding the FOW rules. I learned a lot watching Eric maneuver his infantry to the sides of the Jagdpanthers to reduce the defensive fire from my units. It was a neat trick to see, even though I was on the receiving end of his good infantry tactics. I gave Eric “3” for Sportsmanship, the highest score I gave to my three opponents for the grueling and fun battle.

Platoon of the Match: Red Grenadiers. They made 20+ saves versus Eric ambushing Guards platoon, staying alive and keeping it busy and off the flank of my tanks.

Next up, Game 3 versus Hugo’s 21st Panzer

Tuesday, April 6, 2010

Lions Den I - Part I: Game 1

Mission 1: Hold the Line versus Erick K’s Nisei Rifle Company.

If ever there was a table to funnel armor towards a kill sack, this was it. On the right side of the deployment zone there’s woods on both side of the road leading to the near objective I placed. Looking at the other side, we have more woods, a wheat field and a small river to cross.

View of the table from Erick's side towards my Deployment Zone
Photobucket

I crowd the Jadgpanthers onto the road, planning to bull rush the objectives. I can’t double the Jagd’s because they are Unreliable, but it’s better than plodding 8” and making bog checks. Red Grenadier platoon (named after the colored dot to differentiate it from the other Grenadier platoon) goes on the left flank to make a show of threatening another objective, while the Yellow Grenadier platoon goes into the woods on the right flank. Noak and StuGs will have to go into the woods as well because the road is overflowing with Jagdpanthers. The mortars are in the center.

Deployment of the 654th
Photobucket

Everybody moves forward. Mortars move up to get within range of Erick’s dug-in infantry blob in the center portion of the table. Jagdpanthers drive up the road. A StuG bogs. Not to worry because I have Noak attached to the Confident Trained StuG platoon. One of Noak’s abilities (aside from move and shoot full ROF) is that any armored platoon he attaches to can re-roll failed skilled test, which is a big help to a Trained unit. The StuG re-rolls and still bogs.

Bogged StuG
Photobucket

Erick rolls reserves and gets an infantry platoon (Erick gets all his reserves within 3 turns, but they aren’t a factor in the game because of what happens next). He then unleashes artillery hell upon the road. The lead Jagdpanther is hit with 155mm artillery fire and with AT5, FP2 versus Top Armor 1, it goes boom. The second Jagdpanthers is hit with 105mm artillery, which isn’t so bad with AT5, but with AT4 and FP 3+(?), it’s bad enough and it goes boom.

Dead Jagdpanther Platoon
Photobucket

I’m shocked to see the Jagdpanthers go up so easily and my whole plan of charging towards the objective is thrown off kilter. I start to worry more about the artillery than the objective. StuGs make it through the woods. But guess who bogs - - Noak! Erick and I check Noak’s abilities to see if he can re-roll his own skill test. Nope, only the platoon he attaches to gets a re-roll, but not Noak. D’oh! Noak would refuse to bog for most of the game.

Noak picking his nose in the woods
Photobucket

Mortars go into action and wisely smoke the observers in the center of town. However, the Americans can use staff teams from other units to spot for artillery, albeit at a worse die roll. It doesn’t matter and Erick’s makes his targeting rolls on the first try and it’s Time on Target time and more stuff brews up.

Red Grenadiers are busy digging in the wheat field, trying to draw artillery attention to it. They draw the 105's and get clobbered. Yellow Grenadiers are in the woods, moving to get over the Halfway Line on the table so the game won’t end on Turn 6.

Red Grenadiers get noticed
Photobucket

In the end, I lost all but the Panther to artillery. Erick never bothered revealing his M10 ambush because it wasn’t needed. Noak’s Panther survived but only because he remained bogged in the woods for 3 Turns. The game ended on Turn 7 when Yellow Grenadiers took casualties, forced a morale check, which they fail. I attach Noak to them for a re-roll and he fails. CiC and 2iC Jagdpanthers are dead and so it’s game over.

Dead armor, except bogged Noak
Photobucket

Erick loses 1 stand of infantry to my CiC Jagdpanther before it dies.

Results: Loss, 1-6

Lessons: Pushing the armor single file up the road. Bog checks are a lesser evil then getting decimated by 155 and 105 artillery. I bunched up my armor to avoid going into the woods and gave Erick prime targets every turn. Next time I’ll go into the woods and risk losing tanks to bogging. A bogged tank is still alive compared to a smoldering hulk. I believe fear of bogging an Unreliable tank influenced by deployment of the Jagdpanthers. I also need to remember my stormtrooper rolls. I forgot them several times.

Dice: Dice didn’t do me any favors in the first three turns. My armor saves and bog checks weren’t north of “1”.

Sportsmanship: Erick is a fun opponent. He was very gracious in commiserating with my poor dice rolls and kept repeating to everyone what bad luck it was for my tanks to bog down. Whenever I lost a tank with a “1” or “2” for the armor save, he’d go “Oh, wow” in genuine surprise and never did he rub in the beating he inflicted upon me. In fact, we shared many laughs about his recon unit who tried to do an end-around toward Red Grenadiers, only to have 2iC Jagdpanther crest a hill to shoot at them, which promptly sent the 4 jeep recon unit scurrying behind buildings for the rest of the game. I’d play Erick again anytime. I gave Erick 2 of the sportsman points I had to divide up among my three opponents. (Each player was given 7 points to distribute to opponent sportsmanship scores after each game. Tim said that it’d take an outright armed felony for a person to deserve a 0 or 1 in sportsmanship. Most people ended up earning scores of 3-2-2, which is how I eventually distributed the points.)

Platoon of the Match: GW34 8cm mortars. The mortars did yeoman service. All 4 tubes put smoke in the center of town all game and forced Erick to use his staff teams as observers, making it slightly harder to hit my bunched up tanks. I was very happy with them.

Erick has a nice AAR on the FOW boards that he created using Battle Chronicler. Check it out.

A couple of the responses to Erick's AAR I found interesting:

I think the Germans were complacent in not taking artillery support. It would have made such a difference if those two batteries had to trade fire with the German artillery.

Complacent? Maybe I'll swap 105's for the mortars but not before I play more games in this list's current configuration. But complacent? Build a list. Play the list. Tweak the list. No, the Ger-mans were not complacent. That comment is a head scratcher.

You had some hot dice, yes, and good placement of troops. The German player, on the other hand, had some tactical errors. He relied on the Front armor of the tanks too much, which was no use against artillery. The board didn't help him , with a river and no good lines of sight for his mortar spotter. If he had gotten smoke down on the first turn it would have made things much easier for him. Additionally, mortars generally just don't have a good enough range to easily keep up with an offensive. Seeing the lists, I think the German player was too aggressive with his Jadgpanthers running them down the road on the first turn. In the open they are sitting ducks to US artillery, especially the powerful 155s. He should have advanced under cover or terrain until he could start dropping smoke with his mortars. I think he still would have struggled against you, but it would've been a closer game.

Of course, since I play US paras, I'm glad you won! It's always good to see Germans who take the big "uber" tanks get humbled by a "little" infantry company.


I agree with the tactical errors described and I'll take them to heart. My big tanks were so sad to see tiny men in helmets instead of lumbering hulks with tracks. The 654th does one thing well - blow up tanks at 40". The challenge is learning how to play the army in all missions and against all types of armies.


Coming Soon...Part II - Game 2 versus Eric C's 82nd Paras.

Thursday, April 1, 2010

Lions Den I - Tournament Prep

I was going to present a Checklist of the preparations I am making before Saturday's tournament. In a coincidence, the Bell of Lost Souls blog just posted a similar checklist in the wake of Adepticon.

What follows is the BoLS checklist with comments on my own progress.

Play at least 20 games with your tournament armies.
This is the most important thing for a number of reasons.

Firstly, you will see the strengths and weaknesses of your build, and you can make adjustments. You will tune your army more the more games you get in with it, and the better the army suits your playstyle, the better you will use it.

Secondly, the more familiar you are with your army, the less time you will spend thinking about what to do with it. The less time you spend thinking, the less trouble you will have with the clock. All it takes is one game not finishing to keep you off the top tables.

Lastly, you will memorize or at least come close to memorizing all the stats for your army. This will increase both efficacy of use and speed of play, both of which matter. And constantly having to look things up in your army book / codex makes other players much more likely to have a bad gaming experience with you.


I haven't played 20 games with the 654th. In fact, I haven't played any at 1,750 with this army! What I will do is play 20 games either in tournament or casual settings with the 654th before making any list changes. After 20 games, or even 10, any glaring holes or weaknesses not attributed to my inexperience should be apparent. I'll gobble up any advice thrown my way about the list too.

Review the basic rules of all phases of the game.
Not only will this make you less likely to make mistakes, but it will make you more likely to catch opponent errors, thus reducing the chances your game will have problems that might make you feel cheated later.

Check. I know the basics, but I'll make mistakes. They key will be to ask questions of my opponents and double check with them on the rules areas I'm sketchy at such as assaults.

Bring spare measuring devices and dice.
Because both of these things can get lost. Also having a block of very plain dice is a very good idea. For most games, using lots of different dice is just great, but playing with uniform dice on top tables for the last game, you really want a generic dice block to avoid any questions.

Check. Tape Measure, dice bag and FOW markers are in the army carrying case. I'll also be bringing a baking sheet and placemat to transport the vehicles and infantry from table to table. It'll be cramped in the Realm with 9 tables and I want to be able to easily deploy the force rather than placing and pulling the army in and out of its carrying case. I doubt there will be much space for army cases on the floors (risk of getting kicked too).

Practice judging distances.
Learn how tall your basic models are, exactly. Knowing this will make judging distances a lot easier, and the difference between 6.01 and 5.99 can be the distance between defeat and victory.

Judging distances doesn't really apply in FOW, unless I run into someone who won't let a measurement happen before an assault is declared.

Eat right and get some sleep the week beforehand.
Tournament days are long, and there is usually not a lot of sleep while you are there, and you eat more junk food, too. So put some juice in your batteries – you don’t want to be half asleep like I was last Sunday morning.

Plan to eat a good breakfast and bring snack bars to keep the energy up and starve off the hunger headaches.

Wear comfortable shoes.
Yes, seriously. I think work boots are the best choice; fatigue contributes to making boneheaded choices that you will regret.

No boots, but I do have comfy shoes.

If there are primer missions, play them. If there are missions from last year, play them.
Familiarizing yourself with the mindset of the people who run the tournament helps you to be ready for the curves that are headed your way.

For example, the 40K Missions for BoLSCon last year were all themed on 80s music titles. This year, the 70s will get their chance. The WFB Missions were a narrative quest for The Frostblade; expect another quest.


I've played the Hold the Line mission a few times to know the basic strategies with objective placement. Encounter and Fighting Withdrawal will be new to me since my games usually consist of grab a force and let's play Free For All

Know the scoring system.
If you want to do well, knowing what constitutes doing well really helps. Sometimes all you really need to do is kill your opponents, and sometimes you have to have a pretty army as well. At BoLSCon, if you have your army painted to a 3 color standard, you treat other people with the respect you would like to have, and you crush your enemies, you will most assuredly win the tournament.

No word on any Sportsmanship scores for Lions Den I. No word for Best Painted. There are no points for History. We'll find out.

Play your nightmare army.
After (or while) you get in 20 games with your tournament army, you should play against your own army with the army you least want to face. A couple of times.

At this stage of my FOW experience, any competently played army is a nightmare army to me!

Prepare all the references and army lists you need before leaving home.
Don’t expect to have a printer available to you at the tournament, or to use the one in the hotel business center. Have a folder with all your army lists ready, and all the books you will need ready to go as well. Reducing the amount of last minute details you have to take care of helps you to enter that first game with a clear head, setting the tone for the event off on the right foot.

Army list is laminated to one sheet. I have two laminated Quick Reference Sheets with rules sequences, special rules, dice rolls, etc. Thirdly, I have German equipment, warriors and special rules laminated to a few sheets. In all, I have 5 or 6 laminated sheets to quickly look things up, plus the Mini Rulebook. In previous games, people I've played have used them too.

Remember – this is just a game.
We aren’t curing cancer, we are playing toy soldiers. Don’t take winning or losing too seriously; you will do better if you are having fun and not a ball of stress and angst

Amen.